
Happy on Wheels Cooks
On this page, we hope to provide information and recipes that you will find useful and adaptable to your own dietary needs/requirements.
I do have different options in the kitchen, so some recipes will use an oven, some will use a stove, some will use an air fryer, some will use an Instant Pot (or InstaPot as it’s sometimes referred to) and some will use a slow cooker.
Also, please note that I am not taking credit for all these recipes, if I made the recipe up, I will say so, but for other people’s recipes, I will give their name and contact info if known.
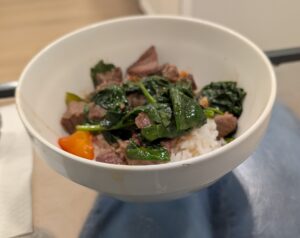
Beef Stir-Fry
Ingredients:
- Minced Garlic Cloves
- Beef pieces
- Beef Broth
- Peppers
- Onions
- Spices (salt, pepper, onion, chipotle, paprika)
- Lime Juice
- Spinach
Directions:
- I like to prepare (dice/chop) everything first because this cooks fairly quickly and I don’t want to have to go back and forth to the fridge. So, I cut the beef tips into bite-size pieces and I mince the garlic and cut the vegetables. Personally, I like to cut things fairly small as it seems to help with our digestion.
- Heat some oil in your pan (I used a wok with a handle, but use pretty much any kind of frying pan you like) and when the oil is hot (maybe 2 or 3 minutes) add the garlic and saute for about 30 seconds. When the garlic is fragrant, add the beef and cook for a about 5 minutes then add ½ cup beef broth. Turn the heat down and let the meat cook in the broth.
- After a minute or 2, add the chopped vegetables and stir around and then let everything cook for a minute or 2 and then add a handful of spinach and stir it around so it wilts (if it seems too dry add some more broth). Add a few squirts of lime juice.
- Serve over rice and enjoy.
Lentils
Not a specific recipe this month, but I want to tell you a few things I have learned about lentils recently. When researching dishes to cook with lentils, I read in several places that lentils are a “nutritional powerhouse.” They contribute protein, folic acid, fiber, potassium, and iron.
I was a little bit concerned about the differences among the colors of lentils that are available; the main ones being brown, green, red, yellow, and black. I’m sure there are more, but those are the main colors I found information about. Lentils of different color are different and not interchangeable, although there are similarities between certain colors. Brown and green lentils are fairly similar, as are red and yellow. The main differences among the different colors are in cooking time and texture.
Another thing I always saw was that you need to be sure to rinse lentils before cooking them, because they often have little, tiny bits of dirt and/or little stones when they are packaged dry.
I am interested in trying some lentil recipes (which I never liked when I was growing up), so look for some here in the coming months.
Variety
You are likely familiar with the saying, “Variety is the spice of life.” Well, to that end, we decided that we wanted to do something a little different for dinner this past St. Patrick’s Day. Keep in mind that this is not an unusual choice for St. Patrick’s Day, it was just something different for us. What we decided was that instead of corned beef and cabbage as we’ve had in the past, we would just have something a bit easier to prepare but still Irish; we decided on a Shepherd’s Pie.
I found various recipes that include various ingredients, but there were a few consistencies. Shepherd’s Pie will always use ground lamb instead of beef (unless, of course, you’re preparing a vegetarian Shepherd’s Pie). Most Shepherd’s Pie recipes will call for carrots and peas as opposed to a Cottage Pie which may call for broccoli, corn, beans, and other types of vegetables.
I posted a recipe for hamburger pie last year, and a Shepherd’s Pie is basically the same except for using ground lamb instead of beef and then using specific vegetables instead of just mixed vegetables from the store. The recipe I used called for a cup of beef broth and a tablespoon each of Worcestershire Sauce and tomato paste instead of a can of tomato soup. Other than that, there were not really any changes.
Using lamb instead of beef does give the pie a different taste. It’s nice to change things around once in a while!
Tomatoes
Even though I haven’t been posting recipes for the past few months, we have been eating! Since I started cooking about 20 years ago, it seems like I’m trying, and liking, a lot of things that are new to me. Chief among them are tomatoes.
When I was a kid, tomatoes were a non-starter for me. Of course I liked ketchup and spaghetti sauce, but those weren’t really tomato-based, right? Remember I was a kid (I’m talking 7 or 8). Ketchup and spaghetti sauces were thick and plain tomatoes were just watery and it ran all over the place if you broke the skin.
Fast forward to my 20s. I was OK with tomatoes on some things, like burgers, salads, or pizza, but I was still not going out of my way to get them. Then, in my 30s I started cooking more and I realized all the different things you could do with a tomato or use it for.
Now I specifically search for recipes that use different types of tomatoes and I love them. One of my favorites comes from the Washington Post: https://www.washingtonpost.com/recipes/roasted-cherry-tomato-confit/
A Start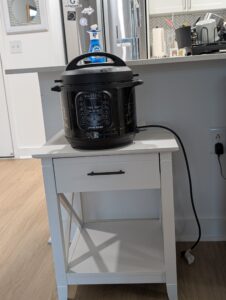
I am fairly certain you know that kitchens, as they are designed most often, tend to be not especially accessible to people who use wheelchairs. Is it totally and completely inaccessible? No, but it is a far cry from accessible to me. Therefore, since I have been doing the majority of cooking for Sheri and me, it was necessary to come up with some type of workaround that would enable me to continue to prepare meals with some degree of the independence I .
Sheri had given me an Instant Pot a few years ago for Christmas, and I began using it a lot during the pandemic and found it extraordinarily easy to use because a lot of times, you just add stuff to the Pot and set the cook time and that’s it,
Now, the first thing I needed to do was figure out a way to have the Instant Pot be accessible to me. That meant it would need to be lower than the counter and, of course, near an outlet; the second thing wasn’t difficult because our new apartment placed a decent number of outlets in and near the kitchen. So, I just needed to find a space to keep the Instant Pot. I found a nice size end table at Wayfair (it came needing assembly, but my awesome sister took care of that for me) and it was the right color to boot!
I will need to figure out ways to make the kitchen as a whole more accessible to me, but this is a start.
Little By Little
The kitchen at our new place was (surprise, surprise!) not really designed for cooks who use wheelchairs. So we are, pretty much, having to make a lot of adjustments. Mostly this means that we need to make adjustments to the way we do things and where things are stored as remodeling the entire kitchen is, kind of, not in the cards right now.
A lot of this will just take time and mean getting used to doing things differently, and to be honest, things are much better than they were a month ago. Fortunately, there are electrical outlets placed at good spots (some of them anyway), so hopefully in the next issue, I will be able to include a picture of a new, little end table that we purchased for the Instant Pot and the Air Fryer, but only one at a time will fit on it at a time, fortunately we have assistants who are able to help move it.
So, we’re taking the view that the kitchen can be fairly accessible if we just make adaptations to the way we manage things.
Retrofitting Accessibility
For the next few months I don’t think there will be any new recipes as we are trying to figure out ways to have this new kitchen be accessible to us.
It’s not really easy to retrofit a kitchen for accessibility. The building we moved to was built in 2008; it has been refurbished, so it is not like some 1890s building that was built with no thought about people who use wheelchairs. It is, however, not especially accessible to us yet.
It can, almost assuredly, be made more accessible by simply rearranging where things are put and some small purchases (like a small table to hold the Instant Pot and/or air fryer).
We will post pictures when we make adjustments.
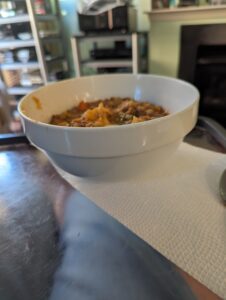
Casserole to Clean Out Fridge
First, let me apologize for having no picture (I did take one but it was not good at all and I didn’t want to use it! That’s how bad it was.)
Okay, as mentioned elsewhere in this newsletter, we are moving at the end of the month and hence are trying to use up things in our refrigerator, and this past week I decided I would begin the process of using up what we have in the fridge and freezer. So, in the freezer I found some chunks of stew meat, and in the refrigerator we had a red pepper, a green pepper, an onion, and some mushrooms. I decided to use those things and just combine them in a casserole.
I figured it would be kind of like just making a hamburger pie, and it kind of was. The beef cubes were too big so the first thing to do was cut the cubes so they were more bitesize. Then cut the peppers and the mushrooms so that they are bitesize as well. Then brown the beef, and add the vegetables, and I figured this would require some broth. So I mixed together about 1 cup of broth (whatever kind you have, I used chicken broth and it came out well) with some flour and a bit of Worcestershire sauce and add it to the meat and veggies and stir it around to combine and let it cook for a few minutes.
After the meat-mixture has cooked for about 5 minutes, dump it all in a cooking-sprayed pan. Then prepare about 6 or 8 servings of mashed potatoes and put them on top of the meat-mixture And bake in a pre-heated 400 oven for 35 minutes.
Hamburgers

We had hamburgers regularly when I was growing up. I have to say that I was a bit intimidated when I decided I would make them here; because the ones I had growing up were so good. We had been buying already formed burgers to cook, but we decided that buying ground beef and making our own was definitely more budget friendly.
You really should pay attention to the lean vs. fat ratio on the ground beef you buy for burgers. A ratio of 80/20 is the best, but it’s not like if you use a different ratio the burgers will be bad, they just might not be as juicy. Anyway, if you buy a 1 lb. package of meat you can divide into four pieces so the burgers will be about a quarter pound each. Then you simply roll each portion into a ball (like a very big meatball). Then just flatten them out into burger shape. You can just do this by hand or you can buy a tool to shape the hamburger. You can see in the picture that the burgers I shaped aren’t perfectly round, but they taste just as good.
They are much more flavorful than ones you buy already shaped and frozen and you definitely save money as well!
Bread from the Farmer’s Market

Something I had never really thought of as being something you’d get at a Farmer’s Market is bread. However, over the past few years we’ve definitely enjoyed loaves of bread, hot dog rolls, hamburger buns, and, of course, the occasional breakfast treat. I think most of us can agree that home-baked breads and the like taste better than the stuff you buy at the store.
The hamburger buns from the Farmer’s Market are great, and they are big, as you can see from the picture, but for me they are almost too big and too much like dinner rolls, for a peanut butter and jelly sandwich! Definitely a first-world problem! But, keep an eye out for bread at the Farmer’s Market!
Throwing Caution to the Wind
You are likely aware that we try to avoid eating things with a lot of sugar and we also, for the most part, eat gluten-free stuff. But sometimes caution gets thrown to the wind and we have both sugar and gluten. Last week was Sheri’s Birthday and we did just that and all of it was great so we wanted to share in case you need to throw caution to the wind sometime (and I think we all need to do that once in a while)!
For Sheri’s Birthday, we had a slice of carrot cake from Harris Teeter and some Jeni’s ice cream. They were both outstanding!
Bacon-Wrapped Dates with Goat Cheese

I made these this past Thanksgiving and they were great! I contacted the recipe owner to ask if I could reprint the recipe, but did not hear anything back yet. So, instead of reprinting, I am just going to link to her site:
https://pinchofyum.com/bacon-wrapped-dates-with-goat-cheese
Mine were cooked a little differently than hers, but not significantly so.
Macaroni & Cheese (homemade, using the Instant Pot)
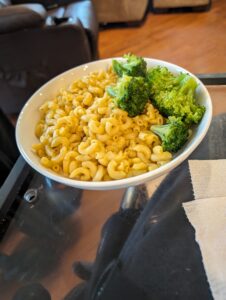
Sometimes you want to just revisit college years; or you may not want to have anything to do with your college years! Regardless of how you felt about it, mac and cheese was likely a staple. Just because it’s simple and easy to prepare. And a box of Kraft Macaroni & Cheese was an easy thing to keep in a dorm room!
After college while I was still living at my parents’ house, my Mom would make mac & cheese from scratch which I thought was better than the boxed kind, but I thought it was difficult to make. I was definitely wrong about that!
I looked around the Web for ways to make it using an Instant Pot thinking it would be quick and not require tons of cleanup. I did find a bunch of recipes, and I just used bits from here and there and followed my instincts and it came out really well!
Ingredients:
- 16 oz. box of elbow macaroni (other shapes of pasta will certainly work, but cooking time may need to be adjusted)
- 2 cups water
- 1 cup chicken broth
- 12 slices American cheese (other types of cheese work well too, but different cheeses melt differently so it’s a good idea to check on how to best melt the cheese you’re using)
- 2 Tbsp. butter
- ½ cup milk
- Garlic powder
- Salt, pepper, and any other spices you like
Directions:
- Cut the cheese slices into strips.
- Put the uncooked pasta in the Instant Pot and add the water and broth and a few shakes of garlic powder, salt, and pepper. Pressure cook the pasta for 5 minutes followed by a quick release. When you open the pot, it will have a lot of water in it. I thought I was going to have to ladle some out the first timer this happened to me, but after sitting for just about 30 seconds the pasta had soaked up almost all the liquid.
- Add the butter and stir it in as it melts. Apparently, the butter will help to prevent the cooked pasta from clumping together.
- Now here’s where most recipes I found differ. Some say to add the milk and cheese a bit at a time, and others say to add it all at once. Whichever you do use, you then just stir until the cheese has melted and everything looks combined. If things look too dry, you can add a little extra milk or if you think it needs more cheese you can add that.
- That’s it! Serve and enjoy.
Butternut Squash Soup in the Instant Pot
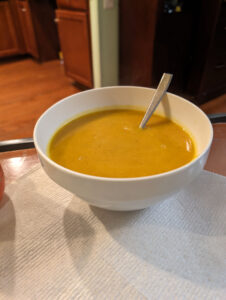
Soup, of any kind, is pretty much always a form of comfort food; it’s just nice to be able to sit back and have a good, hot bowl of soup on a cold winter evening! Even more so when you make it yourself!
Soup is actually a fairly simple thing to make on the stove, but I really wanted to try making soup using the Instant Pot because making soup on the stove, while simple, is, for me anyway, a pretty time-consuming project, and I was hoping the Instant Pot would save some time.
We had a butternut squash and had no ideas for dinner at about 3 o’clock one afternoon, so it seemed like a good time to try it out. It worked really well and took me very little time. Fortunately, I had someone here to assist me with peeling and cutting the butternut squash, so that made it even quicker for me, but it was still a pretty easy and delicious meal to pull together.
Ingredients:
- olive oil
- 1/2 onion, diced
- 3 cloves garlic, peeled and minced
- 3 cups chicken broth (I’ve seen many recipes that suggest using vegetable broth, but all we had was chicken)
- 8 oz. frozen carrots, thawed (I just put the frozen carrots I was using in a cup on the sink for about half an hour)
- 1 medium butternut squash
- pinch of ground cinnamon
Directions:
- Peel, cut, and seed the butternut squash. It just needs to be cut up into chunks not diced.
- Add the vegetable broth, carrots, butternut squash, cinnamon, and any other spices you are using (I suggest adding some salt and pepper but you can always add it later, I’ve also seen some people use cayenne to give the soup a kick, but we don’t use it) and stir briefly to combine. Close lid securely and close the vent and pressure cook on high for 8 minutes, followed by a quick release.
- Using a ladle, transfer some of the cooked soup to a blender (only fill the blender about halfway or be ready for a mess!) and puree until smooth. Season with salt and pepper and enjoy.
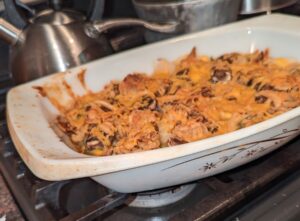
Loaded Cauliflower Broccoli Casserole with Bacon
 I believe I mentioned a long time ago that I was not a big fan of cauliflower when I was growing up. To my youthful eyes, it just didn’t look very appealing! I have changed over the years, and now I really like it! And combined with cheese and bacon, what could be wrong about that?
This is truly a delightful and easy to make side dish and it is pretty healthy too! I didn’t worry so much about making sure I used exactly a half of a head of cauliflower or broccoli, I just used bags of already-cut-into-florets cauliflower and broccoli and just eyeballed it.
Ingredients:
- 8 slices of bacon, fried crispy
- ½ large head cauliflower, cut into florets
- ½ large head broccoli, cut into florets
- ½ cup sour cream
- ½ cup cream cheese softened
- 1 tablespoon mayonnaise (optional)
- 1/4 teaspoon black pepper or to taste
- 2 cups shredded cheddar and Monterrey jack mix
- 3 tablespoons chopped fresh parsley, for garnish
Directions:
- Preheat your oven to 370ºF.
- Fry the bacon in a large skillet until crispy and crumble. Drain from fat and set aside.
- Steam cauliflower and broccoli until tender, about 15 to 20 minutes.
- Combine the sour cream, mayonnaise, cream cheese, and black pepper in a large bowl. Add the steamed cauliflower and broccoli florets, half of the bacon, 1 cup of the cheese mix, and half the parsley and mix well to combine.
- Transfer to a baking dish lightly oiled and top with the remaining cheese, and the other half of the bacon.
- Cover the baking dish with foil and bake for 20 minutes. Remove the aluminum foil and bake another 5-10 minutes or just until cheese is bubbly and beginning to brown.
Zoodle Stir-Fry
I have made this and it was great! 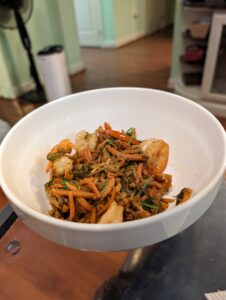
https://www.purewow.com/recipes/zoodle-stir-fry-recipe
I am just posting a link to the recipe, because I have not heard back from the author about whether or not I can copy their recipe to the Happy on Wheels site. Here’s a picture though:
We did do a couple things differently than the recipe:
- We added shrimp
- We didn’t have any snap peas, so we just left them out.
Next time we will try adding water chestnuts!
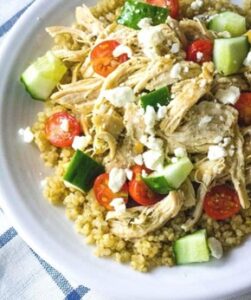
Instant Pot Greek Chicken
This was a very easy, healthy, and good meal. And it is cheaper than going out to Cava!
 Ingredients:
- 2 lbs boneless, skinless chicken breasts, each breast cut into three pieces
- 1/2 medium red onion, thinly sliced
- 1/4 cup lemon juice
- 1/2 cup water
- 1 tsp garlic powder
- 1/2 tsp black pepper
- 1 tsp salt
- 1 tsp dried oregano
- 1 TBSP olive oil
- 1 TBSP red wine vinegar
Directions:
- Place chicken pieces into the Instant Pot. Add onions on top.
- In a small bowl, whisk together lemon juice, water, garlic powder, pepper, salt, oregano, olive oil, and vinegar. Pour over the chicken and onions. Stir to coat.
- Close the lid and set the vent to the sealed position. Select a cook time of 4 minutes at high pressure. After the cook time is complete, allow a natural release of pressure.
- Once the pressure has released and the valve has dropped, carefully remove the lid. Shred the chicken and return to the juices in the Instant Pot, if desired.
- Serve over quinoa, rice, or couscous. Top with cucumbers, tomatoes, feta crumbles, and olives if desired. You could also serve with pita bread and tzatziki sauce.
This recipe comes from Chrysti at marginmakingmom.com/instant-pot-greek-chicken/
It’s Halloween, and Halloween means candy, right? Just about everyone likes something sweet once in a while. Heck, probably even Michael Myers does! Of course there are some people who cannot have sweet things for medical reasons. Even if you are physically OK to eat sweets, it is a good idea to take it easy and not overdo it.
I recently saw a video about using the Instant Pot to make a New York Cheesecake. I did try it out, and while it was very good, it was not something I could put up for auction and retire off! Anyway, here’s the link (it is a captioned Youtube video):
www.youtube.com/watch?v=2qwhQZqbVn0
Hamburger Pie
 It is starting to feel like fall has finally arrived here in Virginia, and there are some dishes that I like to make in the fall because they are comfort food. That is not to say that this dish is not great at other times during the year (it is great anytime!), but there is just something about fall and hamburger pie that go together well. Plus, it is very easy to prepare.
Similar to last issue, I apologize for the not-so-great photo. I promise to work on improving my photography-of-food skills!
Ingredients:
- 1 lb. ground beef
- 16 oz. frozen mixed vegetables (this is the amount I used, but you could use more or less if you want)
- 16 oz. tomato soup (I used regular but you may prefer to use condensed soup for a slightly thicker gravy-type feel)
- 4 servings of mashed potatoes (again, this is what I used, biut you may need more or less)
Directions:
- Preheat oven to 350°.
- Prepare the mashed potatoes as directed on box and set aside.
- Brown ground beef and drain the fat if necessary.
- Cook the vegetables as directed on package, but you do not need to cook them thoroughly; just get them started by cooking for half of the time the package suggests.
- Combine the beef and the vegetables in a casserole dish that has been sprayed with Pam (or similar cooking spray) and add tomato soup. Stir to combine well and then cover with mashed potatoes.
- Bake at 350° for approximately 35 minutes or until potatoes begin to brown and the edges are bubbly.
- Serve hot and enjoy.
Frittata in the Oven

A couple of years ago, I used a recipe for a frittata in the slow cooker in the Happy on Wheels newsletter, and that one is great but because it is done in a slow cooker, it takes a while (about 4.5-5 hours). Baking it in the regular oven only takes about 15-20 minutes.
I looked at a lot of frittata recipes, and found most of them to be pretty standard; except that some recipes call for cooking the frittata on the stove until it sets, before baking it. Because this made sense to me, I tried it this way. It came out well. Sorry for the not-so-great picture of it. I will have to work on my photography-of-food skills!
The size of the frittata was great for two people, but if you need more you would need to just add more eggs and use more ingredients and a bigger pan.
Also, many frittata recipes call for a cast iron or other oven safe frying pan. Because the only oven safe frying pan I have is a 12” skillet (which is too big), I had to use a regular frying pan and a second pan to use in the oven. Fortunately, there was someone here who could help with moving a hot pan with no handle. I’ll have to get a cast iron frying pan! So, the directions below are for the way I did it.
Ingredients:
- 8 eggs
- 1 tspn salt, 1/2 tspn pepper and any other spices you like
- ½ Cup of cheese (whatever kind you like) either shredded or broken into small pieces
- 1 Tbsn of sour cream
- ½ Cup milk
- Diced vegetables (whatever kind you like, you can use cooked meat as well if you’d like, like bacon, ham, or sausage)
- A few handfuls of spinach
Directions:
- Combine eggs, cheese, sour cream, milk, and spices and stir well to combine. Then pour into a buttered 8×8 pan.
In a frying pan, sautee the vegetables for a few minutes to soften them up. When vegetables are soft add the spinach and stir until it is wilted. Then add the vegetables to the egg mixture and stir a little to combine. - Place the pan on a burner on the stovetop and turn the burner to medium to let the eggs cook until set (about 2 minutes). At this point, transfer the pan to the pre-heated oven and bake at 375° for between 15 and 20 minutes. I like my eggs a little firmer, so I was more on the 20-minute side!
- Remove from oven (obviously!) cut with a knife and serve hot.
Dehydration

Air Fryer/Dehydration
As you have probably seen from various pictures that we have posted on our website and/or various social media, we have a pretty good number of herbs on our terrace. We have basil, sage, dill, parsley, thyme, and rosemary. We enjoy using them on things we eat. In the past, I had just been collecting a big colander full of herbs, rinsing them off, and tearing them up to use on things like scrambled eggs. I recently found out that the air fryer I have has a dehydrate button on it. I decided to try it out and it worked well.
I have a small pan to use in the air fryer, and I put all the torn-up herbs in the pan (it was about 2/3 full) and pushed the Dehydrate button followed by Start. The settings using the Dehydrate button are 30 minutes at 200° and that worked well, but I think I might try increasing the time by a few minutes when I try next time. After the 30 minutes things were fairly dried throughout, and I was able to use them like that or I could crumble them into a powder with my fingers!
I was not even aware that there was a Dehydrate option on our air fryer, so you should check on your model (if you have one)!
Instant Pot Beef and Broccoli
 When I first started to use an Instant Pot, one of the first things I tried was dishes that have a Chinese or Thai taste, and they came out pretty well. I think that was mostly because I was able to do everything in the same pot and because the food was always hot when I served it. I seemed like I was able to cook the food without having to stand over it and stir it while it was on the top of a hot stove! You could likely make this recipe on the stovetop, but I imagine it would take a much longer time and it’s so much easier for me to use a self-contained appliance that does not heat up the entire kitchen. Please note that I did not create this recipe.
Ingredients:
- 1.5 pound flank steak
- 2–3 crowns broccoli broken into florets
- 3/4 cup beef broth
- 1/2 cup coconut aminos (I used gluten-free Tamari)
- 2 tablespoons avocado oil or olive oil
- 2 tablespoons sesame oil
- 1 tablespoon minced garlic
- 1 tablespoon arrowroot flour (I used rice flour, if your OK with gluten, I expect regular flour works as well)
- 1/2 tablespoon grated ginger
- 1/2 teaspoon onion powder
- 1/4 teaspoon salt
- 1/4 teaspoon red pepper flakes
- 1/8 teaspoon pepper
- Sesame seeds to garnish
- Chopped green onions to garnish
Directions:
- Turn instant pot onto “sauté” mode and add avocado or olive oil.
- Once oil is sizzling, sear sliced beef (about 30 seconds-1 minute on each side) in batches, ensuring not to overcrowd or over cook. Transfer to a plate once browned.
- Once all beef is browned and on the plate, add minced garlic to the instant pot and sauté until fragrant, about 1 minute.
- Add in the beef broth, ginger, coconut aminos, sesame oil, onion powder, red pepper flakes, salt, and pepper. Add beef and juices from plate to the instant pot, close the lid, and set to “sealing.”
- Select manual and set the time for 10 minutes.
- While beef and sauce is cooking, place broccoli florets in a microwave safe dish filled 3/4th’s with water. Microwave for 3 minutes until lightly steamed for al dente broccoli. Drain water and set aside. Mix in with the beef after cooking. *See final bullet for optional way to cook the broccoli.
- Once beef is done, do a quick release, and put the instant pot back into “sauté” mode.
- Slowly add in arrowroot flour, using a fork to whisk to the liquid as you add it. Add in broccoli and continue stirring as the sauce thickens.
- Remove beef and broccoli with a slotted spoon and arrange in a large serving dish or meal prep containers. Allow the remaining liquid to continue simmering and thickening.
- Once it’s thick and bubbling, pour sauce over beef and broccoli.
- Garnish with sesame seeds, green onions or additional red pepper flakes.
- Optional way to cook broccoli: Once done the beef is done, do a quick release, remove lid, place in broccoli. Close the lid again, set to 0:00 on manual, and set to “sealing” to steam broccoli. This will cook the broccoli more thoroughly as opposed to lightly steaming it for more fork tender broccoli. Then continue with step 7.
Different Teas
We have been trying different teas lately, and enjoying them. I’m sure there are many enjoyable kinds that we have yet to try, but I’m also sure that we will try more in the future.
Of course, there is the plain old black tea that we grew up with and that is still a stand-by at all times! Same goes for green tea. And they both can be either regular or decaf. The picture you see on the right is butterfly pea flower tea. When you steep the teabag, the resulting tea is a royal blue and it turns purple with the introduction of a little acid (lemon or lime juice) and it is great with a little honey.
We have also been drinking ginger tea. You can buy ginger teabags which we used to do, but now our personal assistants like to make their own ginger tea from fresh ginger root and they, very kindly, offer to make us a cup. Ginger tea is very tasty, is said to have nutritional and medicinal benefits, and it is decaf. So that’s three wins for an after-dinner tea! To make the tea from fresh ginger, you simply cut the ginger root into smallish pieces and boil them with water for about 5 minutes and then pour the tea into a cup through a strainer. Some people like to cut up the ginger into very small pieces, but I think that is more trouble than it’s worth.
A third kind that we have tried is tea made by boiling papaya seeds. As with the ginger tea, you add seeds to water and boil them for a few minutes and then pour the boiling water through a strainer into a teacup. Also, similar to most teas that we have tried it is good with honey.
Farmer’s Markets
Sorry there is no actual recipe this month. I just want to encourage everybody to make use of local farmer’s markets. There are a bunch of good reasons to do that: first, it helps you to get outside and do something hopefully in the good weather to get some fresh air and sunshine; second, the stuff you buy there is, in most cases, fresh and more healthy for you than processed food from a grocery store; third, you are supporting farmers and helping them through these tough days; and I’m sure there are many more.
You can find all kinds of things there. Of course fruits and vegetables, but also some great homemade things like pasta or bread and I’m sure plenty of other things from someone else’s kitchen. One thing I always look forward to is fresh herbs to plant on Happy on Wheels’ terrace. I can just taste the pesto made with fresh herbs!
Shrimp Fried Rice
Although this was a last-minute idea for dinner, I think it came out pretty well and it was fairly easy to prepare. Sorry there is no picture, I will add one next time I make this.
For me, it works best to cook things separately and then add them together right before serving, but I know that some people cook things together and that works well too, so do whatever is best for you, but what follows is what I did.
Ingredients:
- Rice (whatever kind you like is probably fine, but I used jasmine)
- Frozen Vegetable Mix
- Shrimp
For Sauce:
- 1 Cup beef broth (chicken broth works OK, the color won’t be the same though)
- 1 heaping TBSP of cornstarch
- 2 TBSP tamari or soy sauce
- Salt and pepper to taste (I used about a tspn of salt and a ½ tspn pepper)
- (I used lemongrass, turmeric, paprika, and a little cayenne, but these are optional and you can really add whatever spices you like. I was thinking of adding a very small amount of sugar next time as well as a dash or two of Worcestershire Sauce.)
Directions:
- Prepare rice and frozen vegetables as directed on package and then combine in a large wok or skillet over a low heat, adding a bit of water as needed to keep things from burning or sticking to the pan.
- Prepare the sauce while the rice and vegetables cook. Add the cornstarch to the broth and stir to combine well before you add anything else (I usually stir for at least 2 minutes) before adding the other stuff. When it is all combined, set aside but keep the spoon you mixed it with handy to stir it up a bit right before you add it.
- Cook shrimp in a separate, smaller skillet, likely about 5 minutes.
- I like adding the sauce to the rice/veggie mixture before you add the shrimp, but some people do the opposite and add it to the shrimp first and some people add it after the shrimp and rice/veggies are combined. Whatever way works best for you is likely OK.
- After everything is combined, stir well to coat everything.
- Serve and enjoy.
Butternut Squash
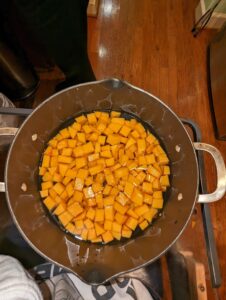
Technically, it’s still winter, although it’s almost spring, so we have been eating a few winter squash that we got back in November and kept in a cool, dark setting to hopefully keep it from getting soft and rotten. This butternut squash last, but it was probably on its last legs when we ate it in January. I had been wondering how to prepare it and so I’ll tell you what I did, because it wasn’t as difficult as it seems. There was someone with me who could assist in the dicing (the cubes in the picture are about 1/2 inch cube whereas if I was cutting them they would probably be about 1 inch cubes; thanks, Ruby!).
First, of course, rinse the squash off and using a sharp knife cut off a little at both ends. Now, most of the videos I watched or directions I read say to peel the skin off using a potato peeler, but I find that really difficult, so I just use a knife very carefully. When all of the outer peel is gone and you’re down to the orange flesh, you use the knife you cut the squash where the body (the round part) and the neck (the longer, straight part) meet. Then you can just dice (or cut to whatever size you want) the neck, I think it’s easiest to slice it in half first, but do what works for you. With the body, you cut it in half to expose the seeds and then scoop them out with a spoon (lots of recipes say to save the seeds for roasting, but I never tried that, maybe next time!), and then just dice up the flesh.
I’ve coated the cubes with oil and spices and roasted them at 400 degrees for about 45 minutes and that was good, but you can probably tell from the picture that this time I just boiled them in water for about 5 minutes!
Green Bean Casserole
 This was a recipe that Sheri had told me that her mother made often. So naturally I was pretty nervous about trying it. Sort of surprisingly, it was very easy and turned out well. This basic recipe is from allrecipes.com, but I added a few things and took a few liberties with measurements. In hindsight, I would likely not use more cheese on top before baking as it made the onions soft instead of crunchy.
Ingredients:
- 2 (14.5 ounce) cans green beans, drained
- 1 (10.5 ounce) can condensed cream of mushroom soup (I try to find some kind of healthy option)
- 1 (6 ounce) can water chestnuts
- Handful of fresh mushrooms
- 1 cup shredded Cheddar cheese (I just used a handful)
- French-fried onions as needed for topping
Directions:
- Preheat the oven to 350 degrees F.
- Mix green beans and condensed soup together in a large microwave-safe bowl until well combined. Microwave on high until warm, 3 to 5 minutes.
- Stir cheddar cheese into the green bean mixture. Microwave on high for 2 to 3 minutes.
- Add water chestnuts and fresh mushrooms.
- Transfer mixture to a casserole dish and spread evenly over the bottom. Sprinkle French-fried onions over top, then sprinkle with remaining Cheddar.
- Bake in the preheated oven until cheese is melted and the onions are just turning brown, about 10 minutes.
Fried Chicken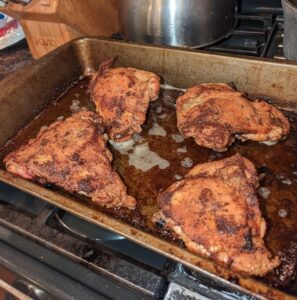
I always wanted to make fried chicken “just like my Mom” used to make, and while it’s not exactly the same, I think it’s pretty darn close. And really simple! I looked around the Internet for recipes and combined some stuff from here and there and when I showed my Mom what I was going to try, she said that was pretty close to what she and her Mom before her did.
When I fry chicken, it’s bone-in, skin-on thighs, but any cut or style of chicken should work as well. I think it’s great right out of the oven, but it is also great cold!
Ingredients:
- 1/3 cup all-purpose flour
- 1 tsp salt
- 1/2 tsp pepper
- 1 tsp paprika
- any other spices you like, I like to add some cayenne pepper for a kick and whatever Penzy’s spices I have around
- about a half a stick of butter or however much it takes to thinly cover the bottom of the pan you are using when melted
Directions:
- Preheat oven to 425 and put the pan you will be using with the butter in it to melt. You can start this later if it is going to take a long time to prepare the chicken.
- In a bowl combine the flour and spices and mix to combine.
- Place the chicken in the flour mixture and coat thoroughly.
- Place the chicken pieces in the pan (in the melted butter) skin side down. It’s best to keep them separated from each other.
- Bake at 425 for 30 minutes and then flip the chicken pieces and continue baking for 15 more minutes or the internal temperature has reached 165.
- Serve and enjoy.
Apple Cake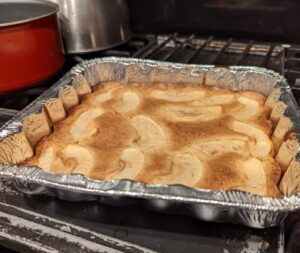
It had been a while since I had baked dessert, so I was kind of excited to try this apple cake! The recipe is pretty simple and not terribly difficult. I did have some help slicing the apple (thanks, Ruby), but other than that, there were no knives involved. It’s a pretty simple recipe, and the cake is great for breakfast the next day.
Ingredients:
- 3/4 Cup all-purpose flour
- 1 tsp baking powder
- pinch of salt
- 1 extra large egg
- 3/4 Cup sugar
- 1/2 tsp vanilla extract (optional)
- 1 stick butter, melted and cooled
- 1 apple, peeled and cut into slices about a quarter of an inch thick
Directions:
- Preheat oven to 350.
- Prepare the dish or pie plate by spraying with cooking spray.
- Mix together the flour, baking powder, and salt.
- In a separate bowl, whisk together the egg and sugar until it is thick and pale then add the vanilla (if using) and butter.
- Stir in the dry ingredients and when combined, pour into the prepared baking dish.
- Bake at 350 for 40 minutes or until a toothpick that is inserted into the middle comes out clean.
- Allow to cool for 15 minutes then serve and enjoy.
Risotto in the Instant Pot
I did not expect this risotto recipe to come out as well as it does on the stovetop and although it fell just short of that, it was remarkably good for a risotto that cooked for only 7 minutes and did not require much stirring!
I am pretty good at making risotto on the stovetop, but I was not thrilled about the time spent standing and stirring. One of our favorite risotto recipes is for a bacon-spinach risotto. It came out well, but I will have to try doubling the recipe next time, because it did not make a lot. Here’s what I did though:
Ingredients:
- Bacon (I used about half a pack) cut into smaller strips
- Garlic
- 2.5 cups broth ( I used vegetable, but I think any flavor would be OK)
- 5 cups arborio rice
- Spinach (I used about half of a 12 oz. bag)
Directions:
- Put the broth in a small pot and heat it up on the stove or in the microwave.
- Set the Instant Pot on sauté and when it’s ready add some oil and the bacon and cook until it is sealed and add in the garlic (maybe about 5 or 6 minutes? I tend to be a bit cautious when cooking bacon and would probably err on the side of it being more done than usual)
- Optional, but for best results, remove the bacon from the Instant Pot pot, add some broth and descale the pot using a wooden spoon with a flat edge. This is to keep the Instant Pot from giving you a Food Burn warning.
- Add the cooked bacon and garlic back in the descaled pot, add the rest of the broth and the rice and stir it around a bit to mix things together. Then put the lid on the Instant Pot and set it to pressure cook for 7 minutes.
- When that is done, do a quick release of the pressure so you can safely remove the lid; add the spinach, a handful at a time, and stir it in until it wilts.
- Serve right away while hot.
Please note that I did not add any seasoning, like salt, because I think the bacon and garlic add enough of a salty taste, but 0if you want to add salt, you should add it before you do the pressure cooking step.
Instant Pot
No recipe this month, sorry about that. Instead, I’m going to tell you about my experiences using the Instant Pot as a slow cooker.
First and very important to me, is that the inside pot of the Instant Pot is metal and a lot easier for me to handle when full when I am using my wheelchair than the heavy ceramic pot from the slow cooker. In fact, I dropped that ceramic one the last time I tried to use it! Anyway, the Instant Pot pot is much easier to handle and a lot less likely to slip from your hands and break; however there are a few things you will need to do differently when using the Instant Pot as a slow cooker.
There are some differences in the heating elements and the placement thereof in the Instant Pot as, opposed to the slow cooker, but I’m not going into technical stuff (as I would likely get it wrong). The main difference I had to make was the amount of time when cooking. For the meatball recipe, which you can find below, the food in the slow cooker should cook for about 5 hours on low, but when using the slow cooker function on the Instant Pot it would probably be more like 6 1/2 or 7 hours. I also found that food was not quite as hot when it is slow cooked in the Instant Pot. It is all cooked, but just not super hot but maybe that was just my Instant Pot. Even though it takes longer, I’m still a fan of the Instant Pot. We decided that buying another slow cooker was not in our best interest. And I didn’t feel like cleaning up another broken spill.
The Instant Pot has a lot of other functions on it which I haven’t yet tried. I will write about them when I do.
Grilled Cheese
 I love a good grilled cheese, but I am terrible at flipping things with a spatula. I had gotten used to just putting cheese in a hamburger roll and nuking it in the microwave for 30 seconds. The cheese melts well enough and the sandwich is hot, but, of course, the bread is soggy. So I was excited to learn that you could easily make a grilled cheese in the air fryer. It may take a little longer than simply using a frying pan on the stove, but comes out browned nicely and very crunchy! I usually just use plain American cheese, but I recently saw a recipe that used Gruyere and brie mixed with chives!
Ingredients:
-
-
- sliced bread (I think using Challah is great)
- whatever kind of cheese you usually use
- butter
-
Directions:
-
-
- Preheat the air fryer to 380°.
- Cover one side of each slice of bread with butter and make the sandwich by placing the cheese on the unbuttered side and then covering it with the other piece of bread (buttered side up).
- Place the sandwich on the rack in the air fryer, and cook it for 3-4 minutes depending on your air fryer.
- Using a pair of tongs or a spatula, flip the sandwich and cook for 3-4 minutes again.
-
Tomato/Mozzarella Salad 
This is a very refreshing and potentially filling (depending how much you eat!) salad. And one that is quite easy to prepare. It does involve cutting, but no cooking, so no risk of burns!
The ingredients are simple: tomatoes, mozzarella, basil, and balsamic dressing to top it off. You can add cucumbers, pine nuts, or croutons if you want.
Directions are simple too: just cut the tomato and mozzarella into bite-size pieces (add cucumber if you want), mix them all together in a small bowl, and top with torn-up basil leaves (sorry the photo only shows one piece of basil; I promise there was more. I’m not sure what happened to it!) and balsamic dressing.
One of the really nice things about this salad is that you don’t have to cut everything small, just as small as you like it. If, as you can see in the photo above, the mozzarella is not cut to all bite-size pieces, that’s fine.
Chicken Pie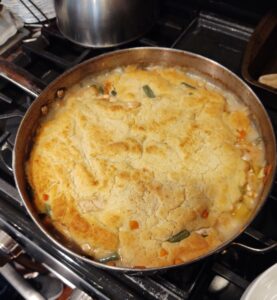
For me, there are few foods that are as comforting as homemade chicken pie. So I was excited to try it, and when it came out well, I was quite pleased with myself. Preparing it and cooking it were both much easier than I had expected, so I’m sure that this will go in the rotation of things I cook.
Ingredients:
-
-
- 1.5 lbs. of chicken (that’s the amount I used, but you could use more or less)
- 12 oz. of frozen vegetables (again, that’s the amount I used, but you could use more or less)
- 2 Tbsp butter
- 2 cups chicken broth
- 2 Tbsp rice flour (I use rice flour as I do my best to avoid gluten, but regular flour would work fine)
- Salt and pepper to taste (I also use turmeric, poultry seasoning, and smoked paprika. Spices are up to you, though)
- 1 16 oz. package of biscuit mix (I used a 16 oz. box and it was good for us, but you may want a thicker crust which means more than 16 oz.)
-
Directions:
-
-
- Cut the chicken into bite size pieces and cook with whatever spices you want in a big skillet (I just used an oven-proof skillet, so I don’t have to use a big two-handed and heavy pan/dish in the oven).
- Turn the heat to medium and remove the chicken from the skillet mostly, but leave a bit to help make the gravy. Melt the butter in the skillet, and add the broth. Then add the vegetables and let them cook in the broth for about 3 or 4 minutes adding more spices if you want. Finally, add in the rice flour and stir until the broth thickens to your liking. It may require more or less flour.
- When everything is ready, pour it all into a baking dish (or use an oven-proof skillet like me).
- Mix up the biscuit dough and when it’s ready put it on top of the hot chicken mix and bake in a pre-heated oven at 350 for 40 minutes or so.
- Serve and enjoy.
-
Twice-Baked Potatoes
These are a comfort food for Sheri  that brings back many memories of her Mother, so, of course, I was a little nervous making them the first time especially considering I had never made twice-baked potatoes before, but I followed the recipe (scaled down as there are only two of us and we didn’t to eat potatoes every day), and they turned out really well.
Ingredients:
-
-
- # of potatoes you want to prepare (the recipe amounts are for 8 potatoes, so you may have to adjust for how many you are making)
- 1 stick of butter
- 1 pint sour cream
- 1 tsp salt
- 1/2 tsp pepper
- 1 Tbsp parmesan cheese
- paprika (for garnish)
-
Directions:
-
-
- Bake potatoes uncovered at 500 degrees for 1 hour.
- Cut potatoes in half lengthwise and scoop out potato from inside of skin.
- Mash scooped potatoes with 1 stick of butter, 1 pint of sour cream (or more, if needed), 1 tsp. salt, ½ tsp. pepper, and 1 Tbsp. parmesan cheese. Mash together until smooth.
- Put mashed potatoes back into potato skins (of ½ potato) and shape until mounded well.
- Brush top of mounded potato with melted butter or margarine, and sprinkle with a little paprika.
- Bake at 325 degrees for ½ hour.
-
Skillet Chicken and Noodles 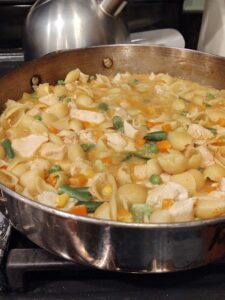
This is the time of year where it’s nice to have comfort food. I mean sometimes it’s nice to just sit around in front a fire, listen to music, and eat some comfort food. For us one of those foods is a basic chicken and noodle dish prepared in a skillet. The original recipe, which I modified, was on the back of container of chicken broth. I pretty much use this recipe as a guideline and make additions or subtractions as I feel like, especially with spices.
Ingredients:
-
-
- 2 Tbsp butter (or less if you don’t want to use so much, you could also use oil; the gravy just won’t be as thick)
- 1 Tbsp onion diced
- ½ cup celery diced
- 3 cups chicken broth
- ½ tsp salt
- ¾ cup flour (I used rice flour, but I would think any type of flour would be OK)
- 1 cup milk
- 1 egg (sometimes I leave this out and the gravy comes out OK, although it is not as thick as with the egg)
- 2 cups cooked chicken (I just used bite-size cubes of chicken, but any kind of cooked chicken would work)
- 1 box cooked noodles (this is whatever kind of pasta you like, usually 12 oz.)
- 1 cup frozen, but partially thawed, mixed vegetables
-
Directions:
-
-
- In large skillet, melt butter and sauté onions and celery until soft (about 3 minutes) then add broth and salt and pepper and bring to a boil.
- In a bowl combine flour, milk, and egg; mix thoroughly and set aside.
- When broth boils , add chicken and noodles and return to a boil. Sprinkle in flour mixture and stir to combine and thicken. Bring to a boil once more and add vegetables and allow to cook for a few minutes until vegetables are cooked through.
- Serve and enjoy.
-
Salmon and Squash
Sometimes we all just need to do something really simple for dinner. And it’s definitely a bonus if that “really simple” meal is both healthy and tastes good. Such is the case with this meal of salmon and butternut squash.
I find salmon to be pretty flexible to prepare and to cook. For example, maybe marinating it in that honey-turmeric marinade I wrote about last year, would work well if you had an hour or so to spend on it before cooking, but even if you only have 10 minutes, salmon covered in olive oil and sprinkled with salt will taste good.
And roasting butternut squash in the oven at the same time as the 0salmon makes for an easy and healthy meal.
Roasting the squash at 450 is a little higher 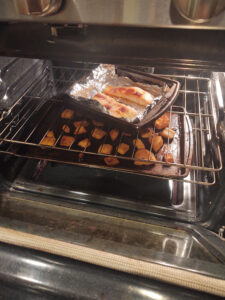 than normal, so it’s possible the squash will be burned a bit on the side facing down. But it’s difficult to ruin butternut squash and just adjust the time for the next try.
-
-
- For squash:
-
- Ingredients:
-
- Butternut squash in cubes and/or chunks
- Olive oil and salt or whatever seasonings you enjoy
- Directions:
- Rinse off the squash and put in a bowl. Add some olive oil and seasonings to the bowl and mix so all pieces of squash are covered.
- Place on a cookie sheet and bake at 450 for about 25 minutes (if you are able to, you can move/turn the squash a bit about halfway, but it’s not necessary and I do not do that as it’s not really safe for me.
-
- For salmon:
-
- Ingredients:
- Salmon filet(s)
- Olive oil
- Salt
- Directions:
- Cover filets with olive oil and sprinkle with salt, let them marinate for as long as you can, but even 5 or 10 minutes should be enough.
- Place in a foil lined pan and bake at 450 for about 17 minutes.
Tacos
Sorry to not have a picture of this recipe; I forgot, but it came out well so I felt like I needed to share it. Tacos are a comfort food, and it is very easy to increase the amounts so you can make a bunch of for either guests or to keep in the fridge for the next day or 2. It’s also fairly easy to increase or decrease the spiciness to suit your own personal taste.
When I made this recipe, I used a package of 3 lbs. of ground turkey, however you can use whatever type and size of ground meat that you want and adjust the amounts of other ingredients; there is not really a right or wrong. Also, I just used ingredients I had on hand. If you want to add something different, go for it!
Ingredients:
-
-
- 3 lbs. of ground meat (I used turkey, but other types are certainly acceptable)
- 1 8 oz. can of diced tomatoes
- 1 8 oz. can of refried beans
- 1 8 oz. jar of salsa
- Spices (I used cumin, chili powder, salt, pepper, cayenne pepper, onion powder, paprika)
- Shredded cheddar cheese (for topping)
- Sour cream (for topping)
- Guacamole (for topping)
-
Directions:
-
-
- Heat up a good-size pan; when it is hot add some olive oil and the meat and brown over medium/high heat.
- When the meat is brown, add spices and stir to incorporate. You really can’t go too wrong here, so add as much or as little as you like. If, upon tasting, you decide you added too much of something, you just do it differently the next time (the first time I make something, I always err on the side of using a bit less than I think would be good, because it’s always easier to add more than it is to try to balance out an over spiced dish).
- Next, you add in the diced tomatoes, refried beans and half a jar of salsa, again, stir to incorporate. If things look dry, you may need to add a little water, but the liquid from the cans of diced tomatoes and refried beans should be enough.
- That’s all you need to do, so just make sure it is heated, then serve over chips (or in a shell, if you prefer) and top with sour cream, cheese, lettuce, hot sauce, onions (and whatever else you enjoy on tacos; my wife likes guacamole, but I can’t stand it).
-
Chicken Amaretto
This is a great dinner and one that I find to be better the next day as well. For those who need or want to avoid alcohol, I think that you could sub a bit (maybe a Tablespoon?) of vanilla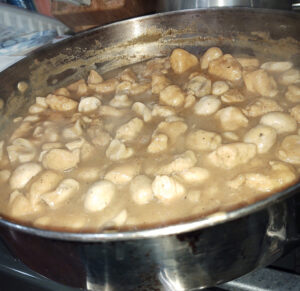 extract for the amaretto or probably you could just leave it out. It is great served over rice with broccoli. I found this recipe online about 10 years ago, but I don’t remember where.
I usually use more chicken than the recipe calls for, so I just increase the amount of the dry ingredients and the chicken broth. Something I like is that you can, pretty much, use whatever you want to in the dry ingredients. So the spices are up to you.
Ingredients:
-
-
- 1/2 tspn salt
- 1/2 tspn pepper
- 1/4 tspn garlic powder
- 1/4 cup rice flour (or regular flour if you aren’t gluten free)
- 1/2 tspn paprika
- 1/2 tspn cayenne pepper (this is optional, but I find it does give it a little kick. You can use as much or as little as you’d like)
- 1 lb chicken cut into bite-size pieces
- 1/4 cup butter
- 1 pint button mushrooms (this is optional but I find it adds a lot)
- 1/4 cup amaretto
- 3 Tbsp lemon juice
- 1 Tbsp cornstarch
- 1 1/2 cups chicken broth
-
Directions:
-
-
- Combine the first 6 ingredients in a large plastic bag and add chicken pieces and toss and shake to coat.
- In a large skillet, melt the butter and then add the chicken and brown evenly.
- Add mushrooms, lemon juice, and amaretto and let simmer for 5-10 minutes.
- Add cornstarch to broth and stir to combine; when combined, stir into chicken and cook until the sauce thickens.
- Serve over rice and enjnoy.
-
Polenta, eggplant, spaghetti sauce, and cheese
We needed to use a few things up (eggplant, before it goes bad and frozen polenta that was just taking up precious space in the freezer). I made this, but Sheri is the one who 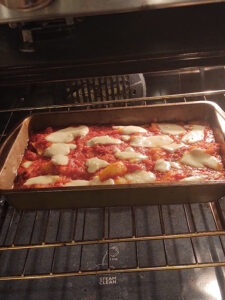 came up with idea; there are likely similar recipes all over the Internet, but this one was just made by trial and error as well as a bit of guesswork (and, of course, I was texting with my Mom throughout).
Ingredients:
-
-
- 1 medium eggplant
- 1 roll frozen polenta
- 1 jar of spaghetti sauce
- mozzarella (I used slices about ¼” thick, but really you can use any kind or even a different cheese if you want)
-
Directions:
-
-
- Spray a medium-sized baking dish.
- Cut the eggplant into bite-size cubes (I did about ½” cubes, but you can make them whatever size you consider bite-size) and put the pieces the air-fryer at 400° for 10 minutes (or you can fry it on the stove) Side note: eggplant tends to be pretty watery so you will likely have to pat it dry with a paper towel before frying it. After frying it put it in the baking dish (the one I used was about 14” long).
- Cut the polenta into pieces (again I used bite-size pieces, but whatever size you want it fine) and put it in the air-fryer at 400° for 10 minutes (or you can fry it on the stove). When it’s fried, add it to the dish. I have heard it’s easier to cut the polenta through the wrapper, but I haven’t tried that yet.
- Then add the sauce to the dish and smooth it over a bit so it bakes evenly.
- Add the mozzarella to the top, as much or as little as you want.
- Bake at 350° for 20 minutes.
-
Shrimp with Broccoli in the Instant Pot
I was kind of wondering what I should do for dinner one night last week. We had some leftover, cooked broccoli (about 1 head already broken into pieces) and we had just bought some shrimp (peeled and deveined and no tails) that were kind of little shrimp. I guess there was probably about 1 pound in the bag.
Anyway, we decided to just throw some things together, even though the broccoli was already cooked, to see how it turned out. I have to say, it turned out pretty well. Sorry that there are no pictures of it. I use the rice maker, but other than that it was all cooked in the same pot, so clean-up was easy enough.
In the Instant Pot, heat some oil and sauté some garlic until fragrant (about 1 minute) and when it’s fragrant, add a mixture of 3/4 cup chicken broth (or a different kind of broth if you like), 2 tablespoons oil, 2 tablespoons sesame oil, 1 tablespoon tamari or soy sauce, some garlic to taste, some ginger to taste, 1/4 teaspoon salt, 1/8 teaspoon pepper. You could add cayenne or red pepper flakes if you wanted to spice this up. All the measurements are approximate so feel free to add or subtract something to suit your own tastes. You just want it to be approximately 1 cup of sauce when you add it to the Instant Pot. Add the thawed shrimp and pressure cook it for 2 minutes. When it’s done, do a quick release and add the cooked broccoli (it could also we raw if that’s what you have). This time you pressure cook it for 0 minutes to cook the broccoli while the pressure builds.
When that’s done, do a quick release and with a slotted spoon remove the shrimp and broccoli from the Instant Pot and set it back to sauté. Add a couple tablespoons rice flour (or whatever kind of flour you use) and stir it around with a wooden spoon until the sauce thickens. Add the rice and broccoli back to the sauce and stir it around a little. Serve over rice and enjoy.
Spaghetti and Meatballs
Spaghetti has always been one of my favorites and is simple enough to prepare on a stovetop. That, however, does involve picking up pots that are full of boiling water; something I’m not too fond of doing after my accident with boiling water back in March. That’s why I was very excited to learn how to prepare spaghetti with meatballs in the Instant Pot!
You can add everything to the Instant Pot, turn it on, and then 9 minutes later you have dinner! You can’t get much easier than that and I really like that you only get one pot dirty. I found a bunch of recipes for Instant Pot Spaghetti and Meatballs, and I use bits from here and there and add some stuff of my own.
Ingredients:
-
-
- Frozen meatballs (I use store-bought frozen ones, but you could probably use your own homemade ones if you wanted)
- Jar of sauce (I use a 32 oz jar of Rao’s)
- Noodles
- Water (about 32 oz is enough, but you need enough water to cover the pasta)
- Fresh herbs (optional
-
Directions:
-
-
- Place frozen meatballs in the Instant Por pot so that they cover the bottom of the pot in a single layer. In my case, that was roughly 25, but I have used fewer because that was all I had.
- Place pasta over the meatballs.
- Pour sauce over pasta.
- Add enough water to pretty much cover the pasta (I just fill the empty sauce jar and that comes out about right).
- Add herbs (really, you can add them anytime).
- Seal the lid and Pressure Cook for 9 minutes.
- Serve and enjoy.
-
Because we try to watch our salt intake, I am not adding it, but you may want to add salt and pepper (and any other spice you like. I sometimes add a bit of Cayenne pepper, just to give it a little kick).
Baby Red Potatoes
Having small red bite-size potatoes is a comfort food and it’s also pretty healthy. Fortunately, it’s very easy to cook them using an air-fryer.
 Purchase a bag of baby, red potatoes (they usually come in a mesh bag). Wash them well (this can be as simple as just rinsing them with water or if they look very dirty maybe you’ll need to be a little more thorough). Next, put them in a bowl and add a bit of whatever oil you like and spices (we just use salt and pepper, but you can use whatever you want). Mix them around a bit so they all have a light coating of oil and spices. Preheat the air-fryer to 400 degrees and set the timer for 20 minutes.
When the air-fryer is preheated, dump the potatoes in the basket and let them cook for 10 minutes and then remove the basket and stir the potatoes around a bit (most recipes say to shake the basket, but that doesn’t work for me, so I stir with a wooden spoon). Put them back in the air-fryer for 10 more minutes (depending on your air-fryer and based on the amount of potatoes, that time may vary a bit). Remove from the air-fryer, sprinkle with whatever spices you like and enjoy.
Chicken Soup
I know that it is not exactly the time of year for soup, but homemade chicken soup with rice was always kind of a comfort food for me…and a bit of comfort is good for us all these days. Much of this recipe comes from my Mom, but I also picked up hints and tips from various people and places.
First, for the chicken you need a split breast (pretty much any type of chicken would work, but a split breast is the best, in my opinion. Put the two defrosted pieces of the split breast in a deep pot and cover them with water (for me I usually fill the pot to about 2 or 3 inches below the rim because I like the broth, but to each his own). I also use some chicken broth if I have some around. You can also add spices if you want. I usually add some salt and some turmeric (mostly for color). Then turn the burner underneath the pot to high so the water can heat to a boil and once it starts boiling, just let it go for 45 minutes or so. If you feel like you need to be very precise, you can use a meat thermometer.
Anyway, after the split breast is cooked through, roughly 45 minutes, remove it from the water and put it in a microwave dish (or really anything you have that holds both pieces) and place it in the refrigerator to cool down for about 15 minutes. Then back to the boiling water.
Add a cup of rice (you can use a little more if you really want a thick soup) and a package of frozen mixed vegetables (I use a 10 oz. bag and it works well for me). At this point you can turn the heat down a bit so the water is still hot, but you don’t want it to boil away. You can add a bit more water or broth if it looks like it needs some.
When the chicken has cooled enough that you can touch it, you should tear it apart and throw away the skin and the bones. You can tear it into pieces the size you want. Finally, just add that back to the pot with the rice and vegetables. You can add water or broth if it looks like it needs it.
Then just let that cook (on a medium heat) for about 45 minutes or an hour, tasting it every once in a while to see if the rice and veggies are cooked. You can add spices anytime.
If you want to you could chop up some fresh parsley to add.
Roasted Cauliflower
When I was a kid, it always seemed like vegetables were supposed to be green, not white. So, I remember eating things like green beans, broccoli, or peas and liking, or at least not throwing a fit, about them. I was not a big cauliflower fan though; I think most of that had to do with it being the wrong color for a vegetable. I would eat cauliflower, but it never really wowed me.
So, I was a little surprised that this dish cane out so well. Originally, it was a recipe I found in the Washington Post, but I find that you can make all kinds of adjustments to seasonings and spices to suit your own tastebuds.
In the recipe below, any alterations or additions I made are in parentheses.
Ingredients
-
-
- 1/3 cup golden raisins (I used more because I like raisins)
- 1 head cauliflower (about 2 pounds), cut into 1 1/2-inch florets (or whatever size you want)
- 2 tablespoons olive oil (I don’t usually worry about carefully measuring oil and spices, if I use too little or too much I can change that next time)
- 1/4 teaspoon freshly grated nutmeg
- 1/4 teaspoon salt, or more as needed
- 1/3 cup raw, skin-on almonds (I used about half a cup of sliced almonds because that’s what we had)
-
Directions
-
-
- Place the raisins in a small bowl. Cover with hot water and let them sit for 10 minutes. Drain. (I used warm water and I didn’t think there was any hugely noticeable difference.)
- Preheat the oven to 375 degrees.
- Arrange the cauliflower florets in a large, shallow baking dish (I used a cookie sheet that has edges). Drizzle with the oil, and sprinkle with nutmeg and 1/4 teaspoon of salt (I also used some turmeric, paprika, and black pepper); toss to coat. Cover the dish with aluminum foil; roast for 10 minutes, then uncover and roast for 25 to 40 minutes, stirring once or twice, until the cauliflower is tender and nicely browned (I let mine go for the full 40 minutes).
- Meanwhile, toast the almonds in a small, dry skillet over medium heat, stirring frequently, until they are lightly browned and fragrant, 5 to 10 minutes. Allow to cool, then coarsely chop (As stated above, I used sliced almonds and so did not chop them).
- When the cauliflower is done, stir in the almonds and raisins until well incorporated. Taste, and add salt as needed.
-
Restaurants
If you read my blog for this issue of the Newsletter (make into link), then it will not come as a shock to you that I am not totally back to the cooking game yet. I do enjoy cooking and I miss it when I’m not doing it, but I am easing back into it slowly. I’m using the air- fryer now and next I will move to the Insta-Pot and finally back to the stove and oven. In the meantime, we are eating meals provided by family/friends and ordering delivery more than usual.
The pandemic has certainly taken a toll on businesses, especially restaurants. We are fortunate to have a very good family-owned restaurant downstairs in our building, Rus-Uz. It provides a great selection of Russian and Uzbekistan dishes which, in most cases, were new to us.
We felt good that we were supporting a family owned business and helping them get through the pandemic. They delivered for free to anyone in the building and were nice enough to bring us a bottle of wine when we ordered dinner for our anniversary. The personal touch makes a difference. We want to continue to support family-owned businesses, especially restaurants, even as more things open up. They are good at their craft and it tastes like you are getting fresh food from your own kitchen.
Roasted Potatoes in the Air Fryer
This is, perhaps, my favorite way to have potatoes. I used to do this a lot using the regular oven, but it got to be kind of difficult (and somewhat scary) to be reaching into a 450°; so I decided to try the air fryer as that is a lot easier to use without risking some major burns! Sorry I have no pictures currently, but I will likely make some soon and I will add pics when I do.
Fortunately, I was able to find numerous recipes to roast potatoes in the air fryer, and by using various parts of different recipes, I have become fairly good at it!
I usually start with two white potatoes (sweet potatoes are great for this, they are just harder to cut). First, I wash them and then, because I’m always anxious during the pandemic, I peel them. I’ve roasted potatoes with skin on and that’s very good, it always just makes me a bit nervous. Anyway, after I peel them, I cut the potatoes into chunks, put them in a bowl, pour a little olive oil and whatever seasonings I have on hand on them. I usually use salt, pepper, turmeric (just a warning, turmeric will really stain whatever it touches so be careful if you use it!), a light sprinkle or two of cayenne pepper to give it a little kick, and finally paprika. Mix it all around and then preheat the air fryer to 400° and put the chunks in the basket and let them cook for 10 minutes. Then remove the basket and with a wooden spoon (it doesn’t have to be wood; I just try to avoid metal things that may scrape the sides) mix around the chunks and then cook for about 8 or 10 more minutes (also at 400°). Two potatoes provide a sufficient amount for two individuals as a side dish with whatever you are having as a main dish.
The times and temps above are what works for me, but they may vary slightly for you depending on your specific type of air fryer.
Slow Cooker Frittata
This past week, both Sheri and I had dental work, me a crown and cavities and Sheri had her wisdom teeth removed. This called for some very soft foods to eat. Fortunately, I had found recently a bunch of information about an egg dish using the slow cooker. I say a “bunch of information” rather than “a recipe,” as I did find many recipes and took various parts of each one and combined them to make what came out as kind of a slow cooker frittata.
Ingredients
-
-
- Package of hash browns (plain potatoes would likely work too, but I used hash browns)
- Any type of vegetables you want to use (I use cooked or raw)
- Any type of sausage or bacon (cooked through and broken up into bite-size pieces; or you can leave this out if you don’t eat meat)
- 1 package of shredded cheese (whatever flavor you like with eggs, we use mozzarella or cheddar)
- 12 eggs (seasoned with whatever you like)
-
Directions
-
-
- Make a few layers in the slow cooker of hash browns or potatoes and then the veggies/meat and cheese (just repeat until you are they are all gone, usually I have two or three layers)
- Pour the cracked eggs over top of the layers
- Cook on high for about 3.5 or 4 hours until the eggs are set (I have also seen recipes that say to cook on low for 8 hours, but I do the former)
-
That’s it! Very simple and easy on the prep. Some recipes suggest spraying the slow cooker dish with cooking spray, and I have tried it but actually, I forgot to do that last time and nothing was terrible without it; the edges were a bit dark, but not inedible or stuck to the dish.
Pizza
I know that, in most cases, we start off the New Year by celebrating with a very fine meal, this year, however, we had a lot going on so we just decided to take it easy and have our celebration with good food in a few days. I’ll write about that next month, but for now I’ll write about what we did last night for dinner because it is good and so easy.
We had homemade pizza. Granted, I just use stuff that is ready to be used/eaten, so a case could be made that it is not exactly homemade, but I think it qualifies.
Anyway, I start with a pizza crust that is made by Schär. We find them at Giant, but you could also order them online. We use gluten-free crusts because Sheri is sensitive to gluten, but you can use a different kind. The Schär gluten-free crusts taste like regular in my opinion.
Next I spread the sauce on the crust and add the cheese. The sauce we use is Rao’s Pizza Sauce (you can also find that online) and the cheese we use is just regular or vegan cheese from Giant. Finally, add whatever toppings you want. We use peppers that are precut, but you can use any kind you want. If you want meat, then add away! I’ve used meatballs (frozen meatballs that  are cooked), prosciutto, ground beef, pretty much anything you want.
Than you just bake it in a preheated oven at 410° for 10 minutes (more if you want it very crispy). It’s difficult to get easier than that!
French Fries Made in an Air Fryer
The air fryer is a fairly recent addition to our kitchen and it makes French Fries in a healthier and much less dangerous way because it does not involve boiling oil! While I am still getting a handle on this new machine, I think it works well and does a better job for me, because it doesn’t involve reaching into a 400° oven! After reading a lot of different recipes, I am getting better at it, but it is still a work in progress; and it’s never a bad thing to have to eat a bunch of French Fries that didn’t come out quite right!
I took a little information from here and a little from there, and just play around. I think soaking the Fries in water makes a huge difference and many of the recipes I read had you cooking the Fries twice at two different temperatures. So, here’s what I’m doing now, and you can take this and play around with it until it’s good with you.
I usually start with two white potatoes. I’ve also used sweet potatoes, but they are so much harder to cut, that I tend to just stick with white potatoes. Personally, I like to peel the potatoes rather than having to thoroughly wash them and the French Fries I like are usually skinned anyway. Then I slice the potatoes into Fries and then soak them in plain, cold water for at least 20 minutes (I’ve seen recipes that say to soak them overnight, but I’ve not tried that). Apparently, this step removes starch and will help the Fries come out crispier.
After they have soaked, I put them in a big plastic bowl and add some oil and seasonings (I use salt, pepper, and paprika as well as anything else I feel like using). Then I lay them in the basket of the air fryer, trying to minimize contact between Fries, but it’s not a deal-breaker if they are touching.
Then cook them for 7 minutes at 370°, then increase the heat to 400° and cook for 5 more minutes. Times are always relative as you know your air fryer better than I do, so it may be a bit shorter or longer for you. And the worst thing that might happen if they don’t come out right the first time, is that you have a great snack!
Cold weather makes us all want comfort foods. One of my favorites is a very simple sweet and sour meatball dish that has a total of 4 ingredients and you can just throw everything together into the slow cooker and let it go for about 5 hours!
Ingredients:
• 12 oz. jar of chili sauce
• 10 oz. jar of grape jelly
• 3 tbsp. lemon juice
• 30-50 frozen meatballs (personally, I use Cooked Perfect Italian Style, but any kind of frozen meatball would work)
Here are the exact directions I received from My Mom: “Stir (first three) ingredients together in a crockpot; add meatballs; cook on low for 4.5-5 hours.” That’s it. You can’t get much easier than that! And they are really good for cold weather and football games.
This is one of our favorite Instant Pot recipes. It comes from Delish.com and on that site it is attributed to Makinze Gore. Below is the recipe straight from Delish, and I will note changes or alterations I made to accommodate our dietary or accessibility needs in parentheses.
Instant Pot Honey Garlic Chicken
-
-
- 4 bone-in, skin-on chicken thighs, trimmed (I used boneless, skinless breasts chopped into bite-size pieces)
- Kosher salt
- Freshly ground black pepper
- 1/4 c. plus 2 tbsp. extra-virgin olive oil, divided
- 1/4 c. low-sodium soy sauce
- 2 tbsp. honey
- 1 tbsp. sesame oil (I did not use sesame oil because I did not have any! It was fine without it, for me, anyway)
- 2 cloves garlic, minced (I used just a few squeezes from a tube of squeeze garlic)
- Juice of 1 lime (I just used a squirt or two of lime juice from a bottle)
- 2 green onions, thinly sliced (in most recipes that call for onion, I just use a few squeezes from a squeeze tube of ginger)
- Pinch crushed red pepper flakes
- 1 tbsp. cornstarch
- Toasted sesame seeds, for garnish
-
Directions
-
-
-
- Pat chicken dry with paper towels and season well with salt and pepper on both sides. Set Instant Pot to Sauté function and add 2 tablespoons olive oil. Add chicken, skin side down and cook until golden, about 3 minutes then flip and cook 3 minutes more. Work in batches as necessary. Turn Instant Pot off of Sauté function.
- In a medium bowl, whisk together remaining ¼ cup olive oil, soy sauce, honey, sesame oil, garlic, lime juice, green onions, and pinch of red pepper flakes. Place all chicken in Instant Pot and pour sauce over. Lock lid and set to Pressure Cook on High for 10 minutes.
- Follow manufacturer’s guide for quick release, making sure to wait until cycle is completely before, unlocking and removing lid. Using tongs, remove chicken from Instant Pot and set on plate to keep warm.
- Ladle out about ¼ cup of sauce from Instant Pot and whisk in cornstarch. Pour liquid back into Instant Pot and set to Sauté function. Let sauce simmer until thickened slightly, about 5 minutes.
- Pour sauce over chicken and garnish with green onions and sesame seeds and serve over rice.
-
-
This is a marinade that I made up by just using various spices and/or condiments that we had in our kitchen cabinets . One thing I have learned about marinades is that you rarely ruin them by substituting ingredients . That’s certainly possible, but you should feel free to try your own and if it doesn’t taste good, you do it differently the next time!
Honey Turmeric Marinade
-
-
-
-
-
-
- 1/2 cup avocado oil (you can substitute any type of cooking oil, avocado oil is just what we use)
- 1/2 tsp salt
- 1/4 tsp ground black pepper
- 4 drops of Ginger oil
- 1 heaping 1/2 tsp of turmeric
- 1 splash organic tamari sauce (considered the same thing as gluten free soy sauce)
- 3 tablespoons organic raw pure honey
-
-
-
-
-
Makes enough for 3 large boneless, skinless, chicken breasts or 2-3 medium sized pieces of fish (we have tried it on scallops, salmon and snapper). Score the chicken or fish (I just use a steak knife), so the marinade goes inside. Put over and let it marinate for at least 10 minutes, but up to a few hours is fine, then bake at 450 degrees for approximately 15 minutes.
I have an instant read thermometer to check ensure that whatever I am cooking is completely done and not undercooked. Chicken should have an internal temperature of 165° and seafood 145°.
Please note that after 15 minutes a very small bit of the bottom of whatever you are cooking, will turn very dark and look like it has burned, but it is the honey that has burned, and not the chicken or fish.